Liliu Fausaga Fausaga Taiala - Tulaga Faatonuina, HT / RotoPower
O lenei tusi lesona e faʻamoemoe e lagolagoina le faʻagaioiga a tagata faʻatau o le PhotoRobot TURNING PLATFORM. O faʻamatalaga e aofia uma ai le faʻataʻitaʻiga masani o le masini, ma le TURNING PLATFORM High Torque (HT) / RotoPower version. O loʻo i ai se aotelega lautele o le faiga, faʻatasi ai ma faʻamatalaga o vaega o le faiga, mea faʻaopoopo, ma faʻalauteleina. E faʻamoemoe e faʻafaigofie le malamalama lautele o le nofoaga faigaluega, suʻega faavae, faʻaaoga muamua, ma le faʻaauauina o le faʻagaioiga o PhotoRobot.
Taua: O le fa'apipi'iina muamua o se PhotoRobot system e tatau ona fa'atinoina i taimi uma e se pule fa'atagaina PhotoRobot. Pulega ma le fa'atagaga e fa'apipi'i PhotoRobot o se tufatufaina fa'amaonia, po'o se sui o le gaosi oloa lava ia.
Fa'amatalaga: Fa'asino i taimi uma i le PhotoRobot Safety Information & Instructions fa'aopoopo i le tusi lesona na tu'uina atu fa'apitoa ma lau masini a'o le'i fa'aaogaina muamua.
PhotoRobot Turning Platform - Standard & HT / RotoPower
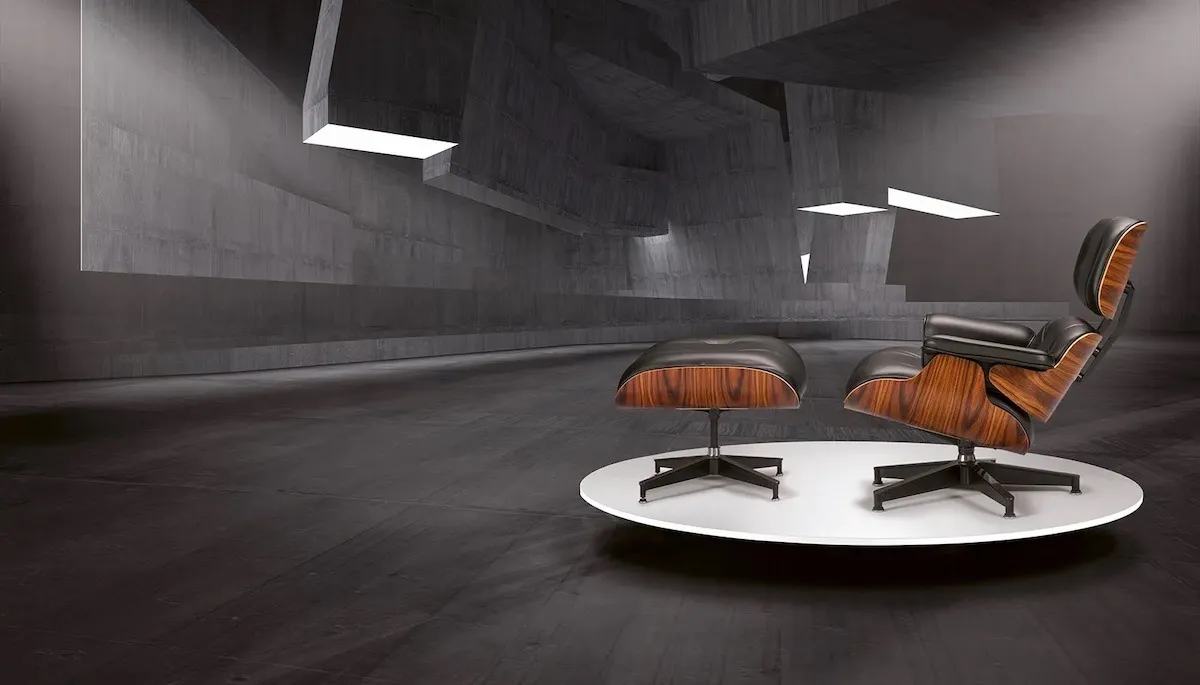
Fa'afetai ma fa'afetai mo le fa'atauina o le PhotoRobot Turning Platform. O le Turning Platform o lo'o fai ma sui o le tele o tausaga o le poto masani ma le fou i tekonolosi pu'eina otometi. Ma e pei lava o faiga PhotoRobot uma, o le masini e mafai ona fetuunai i manaoga tulaga ese o lau pisinisi. E galue ma fa'aopoopoga lautele, ma e fetaui ma le tu'ufa'atasia ma fa'alauteleina robots pei o le Robotic Arm ma Cube. O le mea e sili atu ona lelei, PhotoRobot o lo'o tu'uina atu se siosiomaga tele o fofo sauniuni mo tagata fa'atau PhotoRobot, fa'amautinoaina ni i'uga mata'ina – faigofie, vave, ma faifai pea. Fa'afeiloa'i i le PhotoRobot-powered studio.
1. Faamatalaga o Oloa - Liliu Tulaga
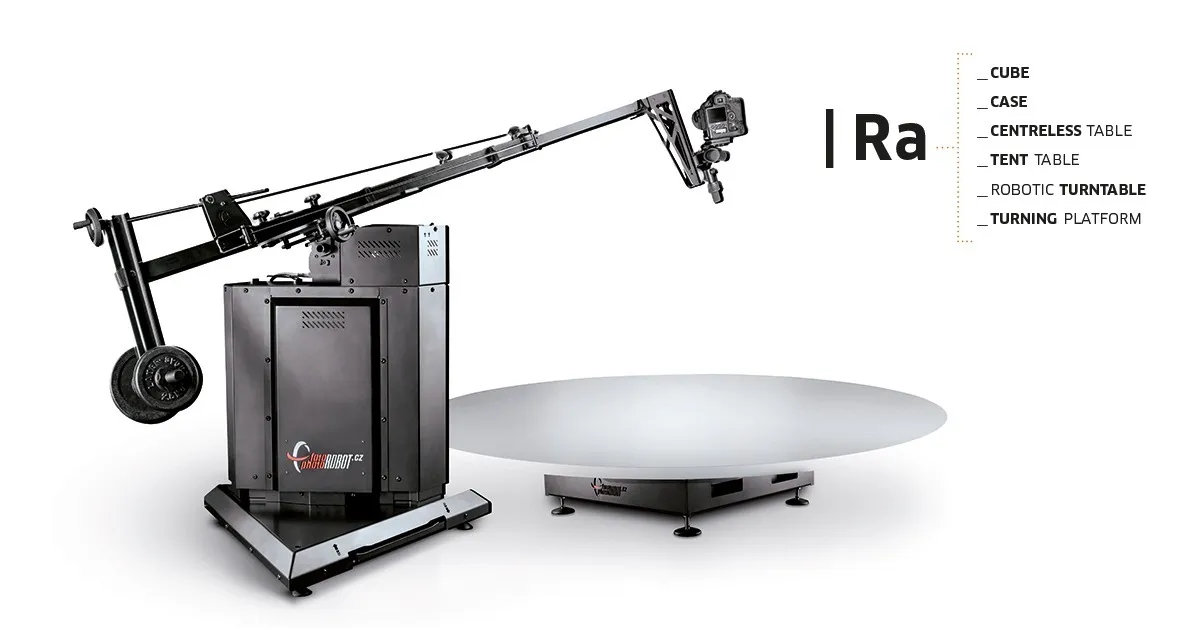
O le fausaga opea liliu o se mamafa-tiute, turntable ata afi e feauaua'i laiti i tele, malamalama ma mea mamafa mo 360 ata. O lo'o avanoa i ni lomiga se lua: o le fa'ata'ita'iga masani o le Turning Platform, ma le Turning Platform HT / RotoPower.
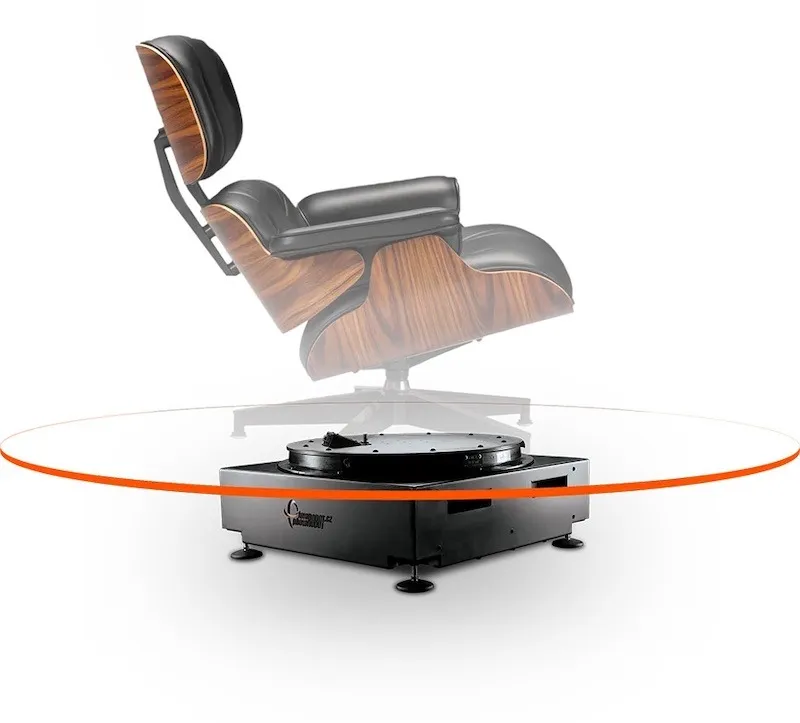
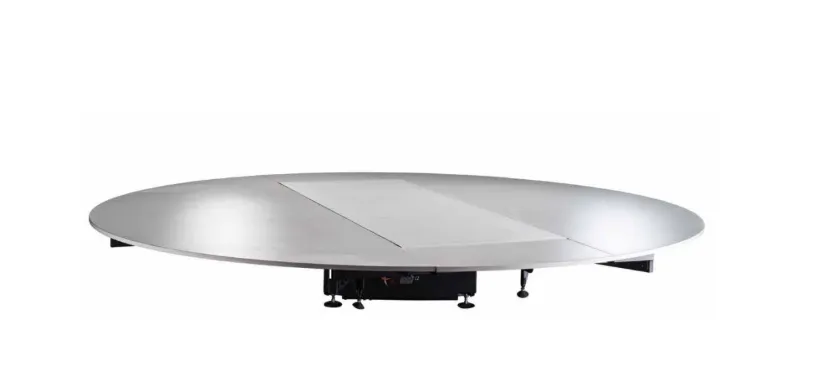
I se fa'atusatusaga, o le HT / RotoPower version o le Turning Platform o lo'o fa'aalia ai se sapalai o le eletise i le vaega fa'ata'amilomilo o le tulaga. O le eletise socket fa'atagaina mo plugging eletise masini i totonu ma fa'amalosia mea i luga ao le liliu tulaga o lo'o fa'agaioia.
I le taimi nei, lomiga uma e lua o le Fausiaina Fausaga Opea i ai se mamanu malosi ma lagolagoina le tele o ituaiga o faaopoopoga e galue o se fofo lautele mo ata turntable. I le taimi lava lea e tasi, pulea polokalama-tulia synchronize lamolemole turntable feauaua'i ma mea pueata pueina ma moli studio e otometi ata ma post-faagasologa.
Fa'amatalaga fa'apitoa ma vaega autu o le Liliu Fa'avae e aofia ai:
- Turntable ipu lapoa lapoa e oo atu i le 280 cm (9.2 ft) mo mea laiti i mea tetele.
- Utaina gafatia fanauina e oo atu i le 1,500 kg (3,307 lb).
- Fa'asalalauga fa'asalalau fa'apipi'i ma le malosi torque maualuga.
- lagolago faatuatuaina mautinoa le tulaga mautu o le ipu turntable, ma gaoioiga zero pe a taofi.
- Ramp mo faigofie avanoa i le turntable (e pei o uila afi).
- Transformable HT / RotoPower version into the Virtual Catwalk for photographing and filming live models.
- Fa'atulagaina fa'apitoa ma le fa'alauteleina o le Robotic Arm V8 ma le mannequin stands.
- Tele ituaiga o faaopoopoga mo turntable pueina ata.
- Polokalama-tulia fa'atonutonu mo le robotic workstation, mea pu'eata, moli, ma pou gaosiga.
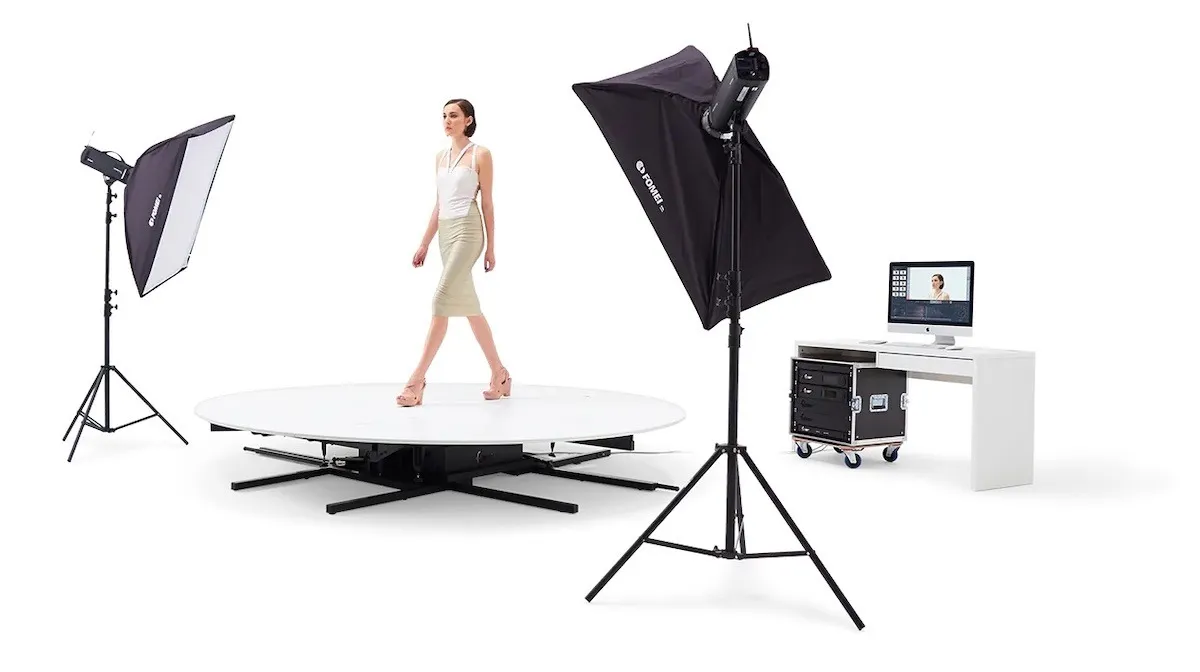
1.1. Studio Integration - Liliu Tulaga
I le fa'aaogaina o le studio, o le Turning Platform e lagolagoina le pu'eina o ata otometi o mea laiti i mea tetele e o'o atu i le 1,500 kg (3,307 lb). E aofia ai mea mai mea faigaluega a le fale ma meaafale i togalaau tractors, masini, ma taavale afi laiti. Ramps laiti maua ai avanoa faigofie i le turntable, ao zero-kilia faasalalauga mautinoa sologa lelei turntable feauaua'i mo so o se mea.
E fa lapo'a papatusi avanoa: 2.8 m (9.2 ft); 2.6 m (8.5 ft) × 2 m (6.6 ft); 1.8 m (5.9 ft); 1.0 m (3.3 ft). I le taimi lava e tasi, o le Turning Platform e mafai ona tu'ufa'atasia ma le fa'alauteleina o le Robotic Arm mo le televave tele-laina ma le 360 spin photography o oloa tetele.
Afai e fa'aaogaina le Turning Platform HT / RotoPower, o le tulaga e mafai foi ona liua i le Virtual Catwalk infinite runway mo le pu'eina o ata ma le pu'eina o fa'ata'ita'iga ola
1.2. Masini Aotelega o le Liliu Tulaga
1.2.1. O le liliu Fausaga Opea HT / RotoPower maua ai le faasalalauga zero-kilia ma le mana torque maualuga e mautinoa ai le faatinoga turntable tulaga ese. Pe a fa'atusatusa i le fa'ata'ita'iga masani Liliu Tulaga, o le HT / RotoPower ei ai se paoa sapalai i le fa'ata'amilomiloina vaega o le tulaga. O lenei mea e mafai ai ona fa'apipi'i masini eletise e fa'amalosia ai i latou a'o pu'eina le mea i le taimi e tasi i le taimi o le feauaua'i mo le 360 ata.
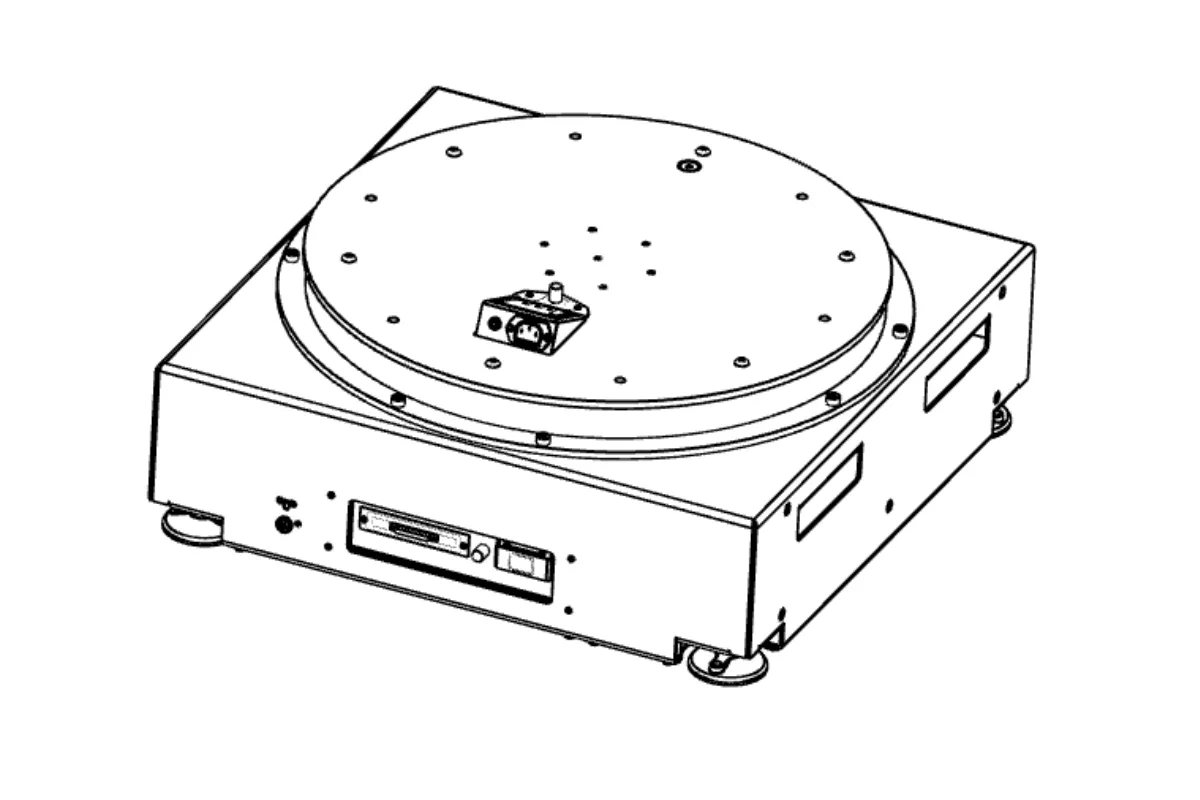
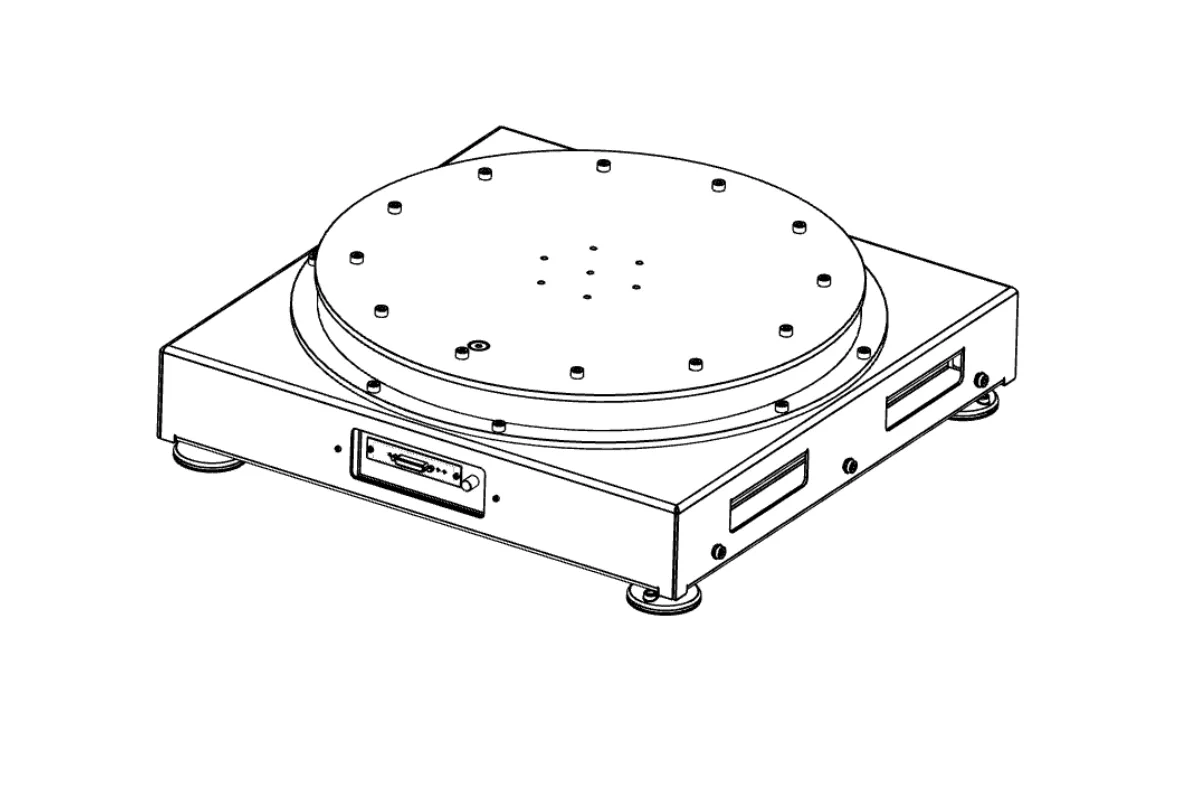
1.2.2. O le Liliu Fausaga Tulaga (fa'amatalaga masani) o lo'o fa'aalia ai se ipu e aunoa ma le sapalai o le eletise i le vaega fa'asolosolo. E aoga mo le pueina o ata o mea e le mana'omia le malosi i le taimi o le pu'eina o ata.
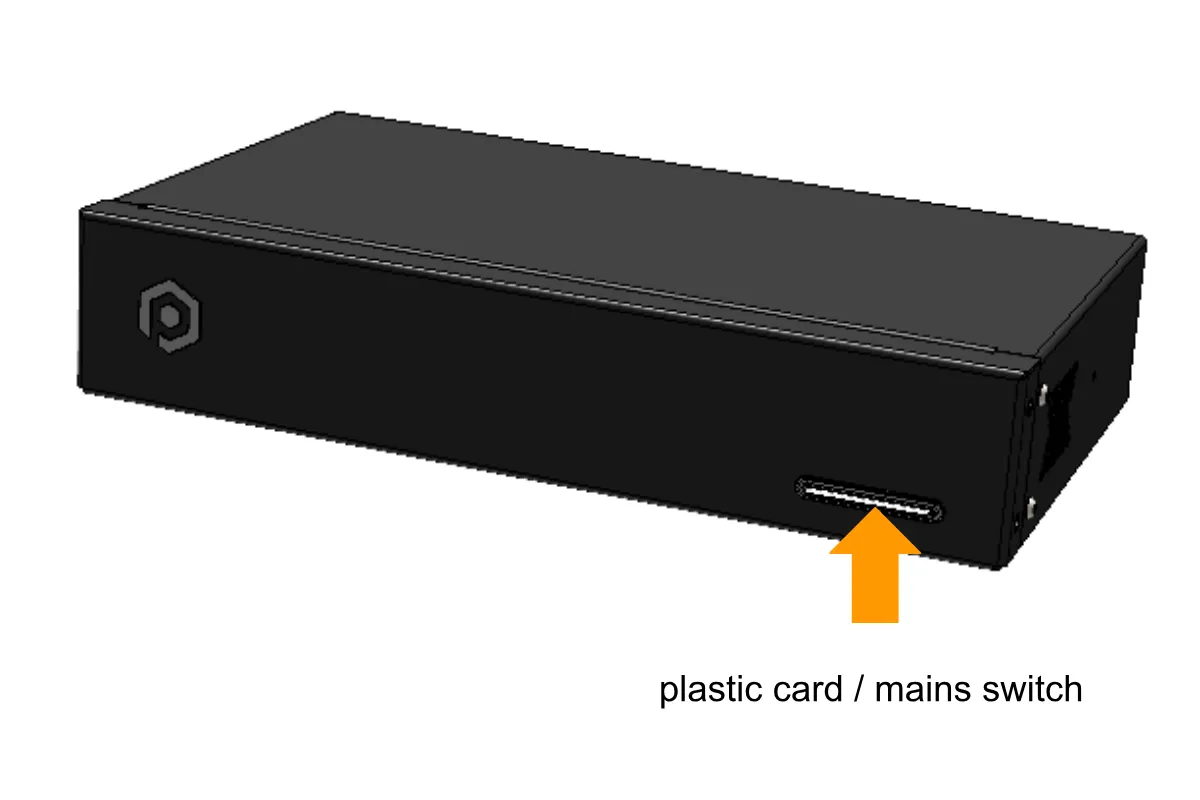
1.2.3. Manatua o le Iunite Pulea o se vaega ese ae taua o le masini Liliu Tulaga, fa'amalosia ma tu'uina atu le fa'atonutonuina o le masini. E masani lava, o le Control Unit o lo'o i totonu o se fa'apitoa PhotoRobot HD rack case na tu'uina atu ma le faiga. O lo'o i ai se pepa palasitika / ki mains i le pito i luma o le Control Unit.
1.3. Liliu Fa'avae - Virtual Catwalk Fa'alauteleina
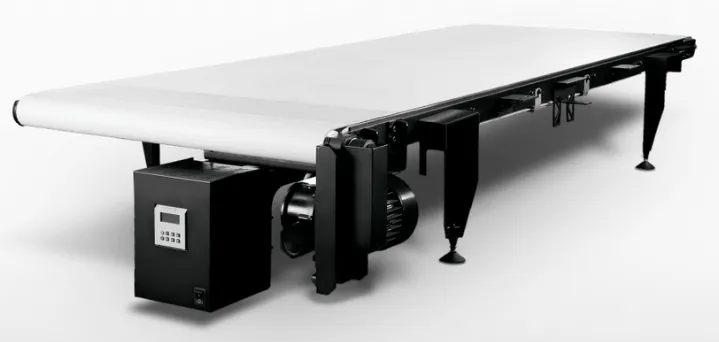
O le suiga o le Turning Platform i le Virtual Catwalk e mafai ma le Turning Platform HT / RotoPower. O le Virtual Catwalk ona ofi lea i se avanoa o le 7 x 7 mita, e ufiufi ai le fa'ata'amilomiloina o le liliu ipu i le tu'ufa'atasia ma le fusipa'u savali. E lua itu o le gaoioiga: o le gaioiga o le savali-i luga o le fusipa'u, ma le gaioiga o le fa'ata'amilomiloina tulaga. E mafai ona fa'ata'amilomiloina uma i le taimi e tasi a'o fa'agaioia le fusipa'u e pu'eina pe pu'eina ni fa'ata'ita'iga ola o lo'o savavali i luga o le auala e le gata.
Fa'amatalaga: Mo nisi fa'amatalaga i le fa'atulagaga ma fa'atonuga mo le fa'agaioiga o le Catwalk, taga'i i le Tusi Taiala mo Tagata Fa'aoga o le PhotoRobot Virtual Catwalk.
1.4. Liliu Fausaga Tulaga - Robotic Arm V8 Fa'alauteleina
I le avea ai o se faʻaopoopoga faʻalauteleina filifiliga, o le TURNING PLATFORM e fetaui ma le ROBOTIC ARM V8 e faʻavave ai le puʻeina o ata tasi-lainu ma 360 o mea tetele.
Fa'amatalaga: O le ROBOTIC ARM e fetaui ma le tele o PhotoRobot rotary TURNTABLE ma masini, e aofia ai le Cube robot. Afai e fa'aaogaina le TURNING PLATFORM po'o se isi PhotoRobot masini ma le ROBOTIC ARM, fa'asino i le Robotic Arm V8 User Guide mo se lagolago fa'aopoopo.
2. Faatonuga mo le Faaaogaina Muamua
A'o le'i fa'aaogaina muamua le PhotoRobot Turning Platform, e mana'omia le malamalama i le manatu o le fofo. PhotoRobot o se iunite modular e aofia ai masini ma polokalama vaega. Mai se vaaiga fa'apitoa, o lenei mea e mana'omia ai le PhotoRobot e fa'afeso'ota'i i luga o le feso'ota'iga lava e tasi e pei o se komepiuta o lo'o fa'agaioia. E le gata i lea, o le feso'ota'iga e tatau ona i ai se feso'ota'iga initaneti ina ia mafai ai ona fa'atautaia auaunaga PhotoRobot, lea e mafai ona maua i le ao.
Taua: Vaʻai i taimi uma i le PhotoRobot Faʻaaogā Muamua & Suʻega Faʻavae e faʻamaonia ai manaʻoga faʻapitoa mo le faʻagaioiga, ma mo faʻatonuga auiliili i le faʻafesoʻotaʻi o le PhotoRobot i se fesoʻotaʻiga.
2.1. Mana'oga Fa'avae Fa'agaioiga
I se tulaga lautele, o lo'o i ai mana'oga fa'avae fa'avae nei mo le Liliu Fa'avae.
- E tatau ona feso'ota'i le iunite fa'atonutonu i le feso'ota'iga i le lotoifale.
- E mana'omia se komepiuta e fa'atautaia ai le Service GUI po'o le polokalama a le tagata fa'agaioia e ta'ua o le _Controls.
- O le komepiuta e tatau ona fesootai i luga o le fesootaiga lava lea e tasi e pei o le Iunite Pulea.
- E tatau ona i ai se feso'ota'iga initaneti i luga o le upega tafailagi.

2.2. Mana'oga mo le Tufatufaina o le Eletise
E tatau i tagata fa'aaoga ona siaki tapula'a o le eletise tufatufaina (fa'ata'ita'iga, voltage ma taimi). O lenei mea e mana'omia ai le siakiina o le RJ45 connector i le pito i tua o le Control Unit. Afai e le o tausisia le fa'atulagaina o le Iunite Fa'atonutonu, seti muamua e ala i le sailia o le tusi lesona voltage selector i tua o le Control Unit. Ona fa'afeso'ota'i lea o le Control Unit i le feso'ota'iga e ala i le uaea ethernet e fa'aaoga ai le RJ45 connector.

2.3. Mana'oga Fa'atulagaina o Feso'ota'iga
E mana'omia le fa'amalieina o mana'oga fa'atulagaina o feso'ota'iga mo le fa'agaioiga o le Liliu Tulaga.
- E fa'amalosia le fa'aaogaina o le DHCP i luga o le upega tafailagi.
- TCP ports 7777, 7778 feso'ota'iga e tatau ona fa'atagaina.
- E tatau ona fa'atagaina fa'asalalauga a le UDP i luga o le uafu 6666.
- E mana'omia le feso'ota'iga i le Initaneti.
- *. photorobot.com tatau ona fa'atagaina le fa'aaogaina.
- as-unirobot.azurewebsites.net tatau ona fa'atagaina le fa'aaogaina.
- E fautuaina le feso'ota'iga uaea o le PhotoRobot i le LAN.
- Va'ai i le PhotoRobot Networking Prerequisites & Configuration e fa'amaonia ai le fa'atulagaina sa'o ma mo le fo'ia o fa'afitauli pe a mana'omia.
- Fa'afeso'ota'i le eletise eletise i le eletise eletise.
I le faaiuga, oomi le ki o le mains i luga o le iunite pulea. A suia le tulaga, o le a suia le moli mai le emo i se moli tumau, e fa'ailoa mai ai ua sauni le Control Unit mo le fa'agaioiga.
2.4. Su'e le tuatusi IP a PhotoRobot i luga o le LAN
Ina ia mafai ona maua le tuatusi IP o le Turning Platform, fa'aaoga talosaga lagolago nei e su'e ai le feso'ota'iga mo PhotoRobot.
- Windows - frfind mo Windows
- Mac OS X - frfind mo macOS
- Android - PhotoRobot Locator i Google Play
- iPhone, iPad - PhotoRobot Su'e i le iTunes
Fa'aaliga: A mae'a ona su'eina se masini PhotoRobot e fa'aaoga ai se talosaga lagolago, kopi le tuatusi IP. Ona faapipii lea o le tuatusi IP a le PhotoRobot i so'o se 'upega tafa'ilagi i le URL format. Afai e manuia, o le a fa'alauiloa le Service GUI, lea o le a fa'aalia ai se fa'avae fa'apitoa mo le su'esu'eina o le PhotoRobot.
2.5. Tamo'e Su'ega Fa'avae mo le Liliu Fa'avae
A mae'a ona tatalaina le Service GUI, fa'aaoga le faigofie tagata fa'aaoga fa'atonutonu e muamua fa'amalosia ai le afi, ona liliu lea o le tulaga i so'o se tulimanu mana'omia.
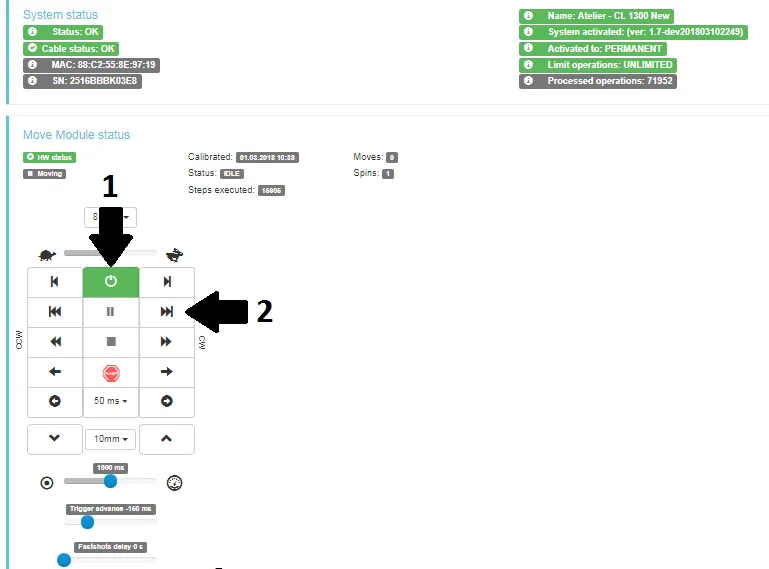
- Ki i luga o afi (aū 1), taumafai e fa'ata'amilomilo (aū 2).
- Afai e fa'ata'amilomilo le ipu tioata, ua sauni lau masini PhotoRobot Turning Platform mo le fa'agaioiga masani.
3. PhotoRobot _Controls Polokalama
Ia silafia e le o aofia le polokalama PhotoRobot Controls App (“CAPP”) i le faaooina atu o le masini; o se faatau ese mai le masini. E mafai ona maua le laiga o le CAPP e ala i lau PhotoRobot Account, ae o le CAPP e maua ai le pulea atoatoa o le Turning Platform, ma isi masini PhotoRobot. E tuufaatasia e le CAPP le pulea o robots, mea pueata, moli potu, ma le gaosiga mulimuli. E aofia ai foliga o le puleaina o galuega faapea foi ma galuega talafeagai mo le otometi lelei i le gaosiga mulimuli.
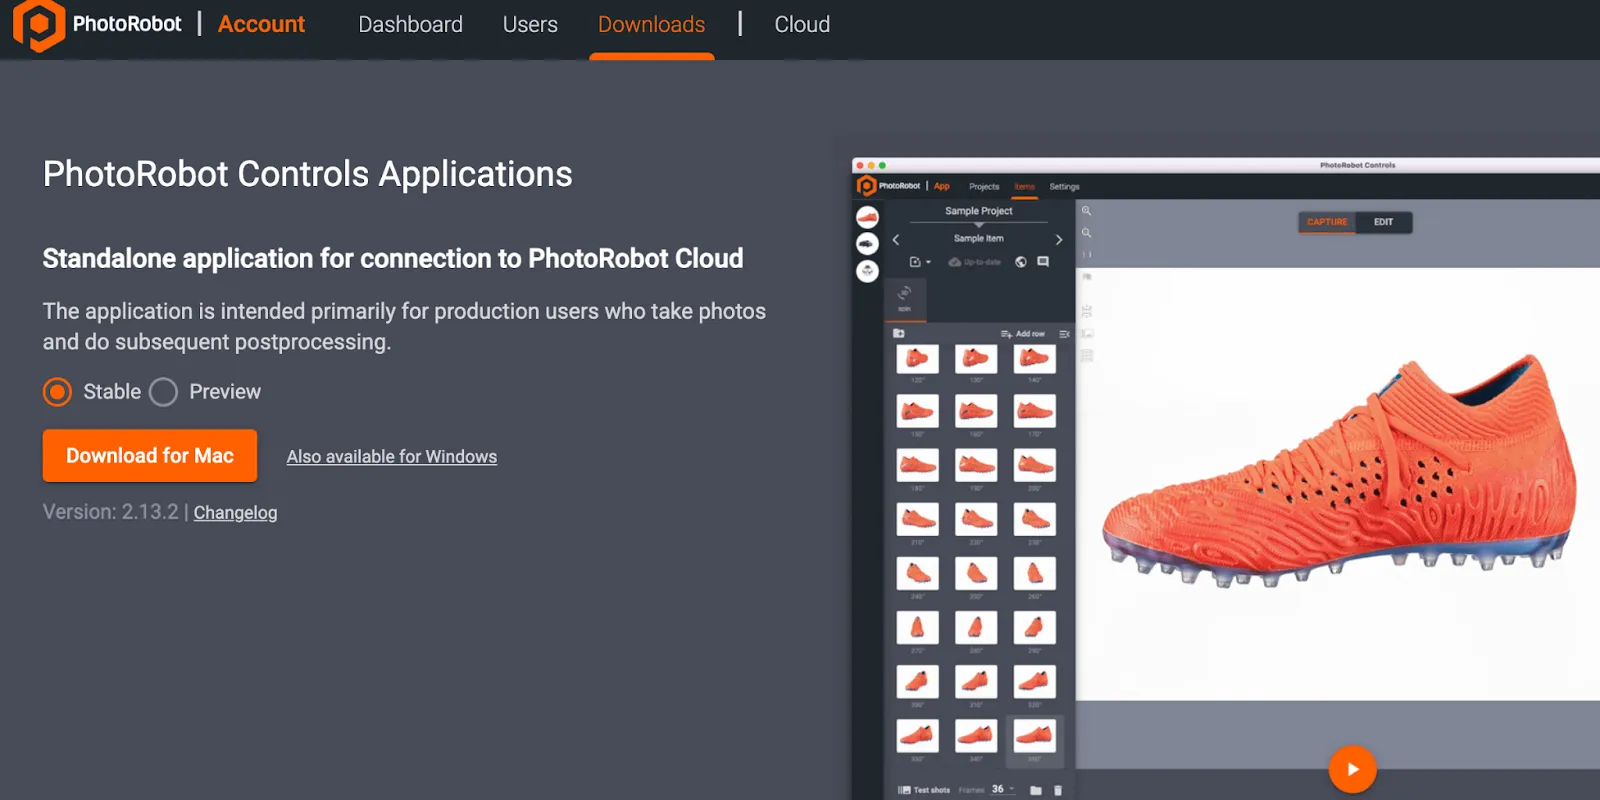
Fa'aaliga: I le amataina pe a mae'a le fa'apipi'iina, mafaufau e mafai ona otometi lava ona amata le Ofisa i le "wizard mode". Wizard mode o se fa'afaigofieina tagata fa'aaoga feso'ota'iga lea e fa'atagaina ai na'o le su'eina o barcodes e fa'ailoa ai mea ma amata le pu'eina ma le mae'a-fa'agasologa otometi.
Mo fa'atonuga auiliili i le fa'apipi'iina ma le fa'aogaina o le PhotoRobot Controls App Software, taga'i i le Tusi Lesona a le Tagata Fa'aoga Amata a le PhotoRobot.
4. Fa'amatalaga Fa'amatalaga
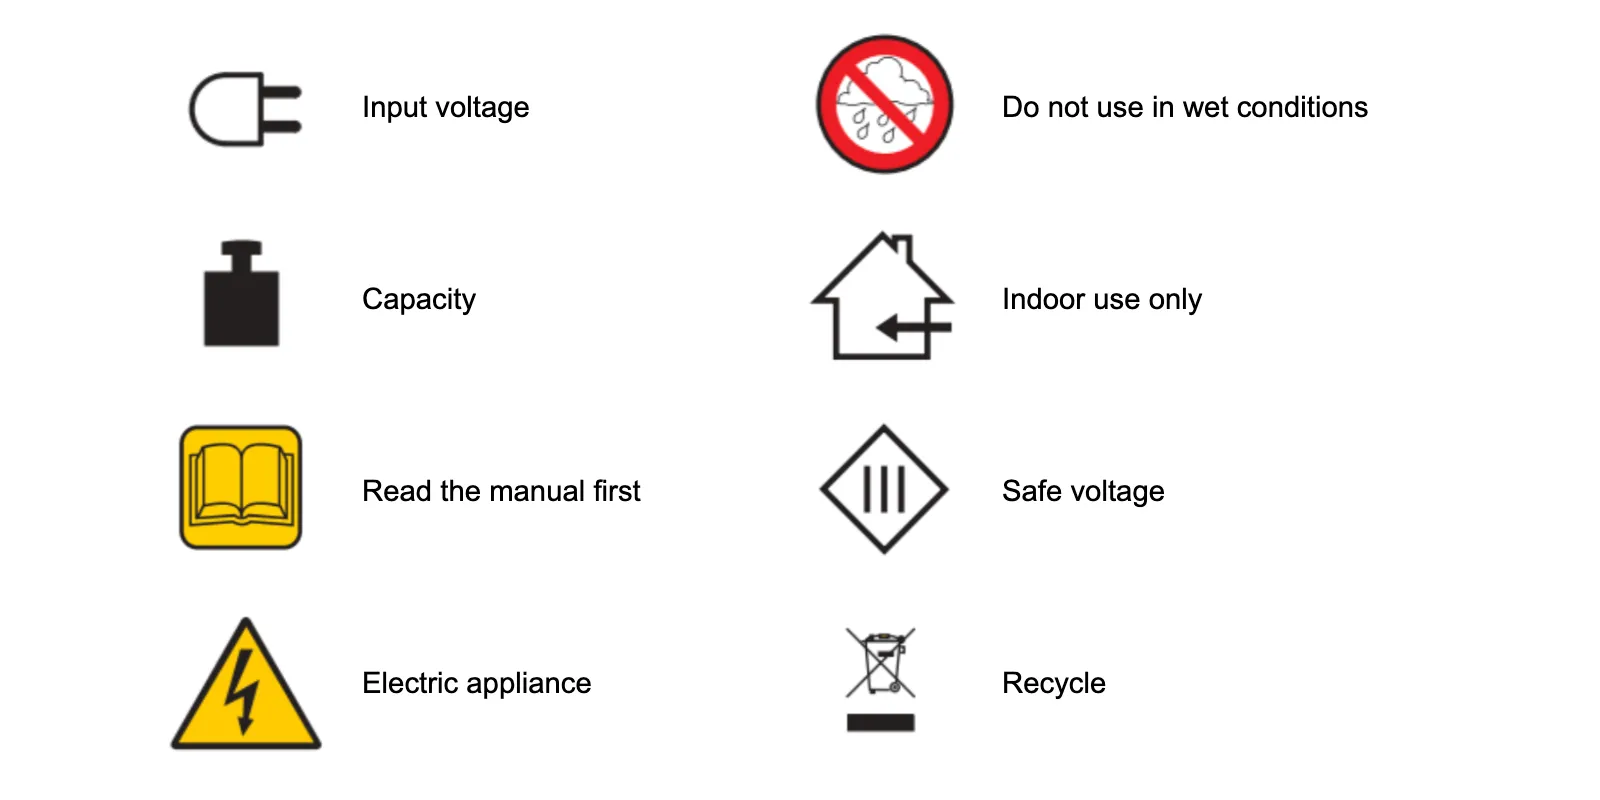
4.1. Aotelega o Fa'ailoga
4.2. Masini ma Vaega Fa'ailoga
Mo fa'amatalaga fa'amatalaga mo masini ma vaega fa'apitoa, va'ai i le vaega Fa'amatalaga Fa'amatalaga (3.1.) mai PhotoRobot Safety Information and Instructions.


Faasologa o le Tetee o le EOS


Faasologa o le EOS DSLR


EOS M Faasologa e Leai ni Faaata


Faasologa o le PowerShot


Tapuni / Uulima

O le Canon EOS Rebel Series o loo ofoina atu ai ni meapueata DSLR e fiafia i ai tagata amata e i ai ata mautu, puleaina manino, ma vaega e eseese ai. E talafeagai mo tagata e fiafia e pueina ata, o nei mea pueata e maua ai le taulai atu faatuatuaina, lau faaaoga e eseese tulaga, ma le pueina atoa o le HD po o le 4K.
Fesootaiga
Faaiuga (MP)
Faaiuga
O le Canon EOS DSLR Series e tuuina atu ai ata e maualuga le tulaga lelei, taulai vave, ma le faaaogaina, ma ua talafeagai ai mo le pueina o ata ma le gaosiga o vitio.
Fesootaiga
Faaiuga (MP)
Faaiuga
O le Canon EOS M Mirrorless Series e tuufaatasia ai le mamanu maopoopo ma le faatinoga e pei o le DSLR. O loo i ai ni tioata e mafai ona fesuiai, taulai vave, ma senesori o ata e maualuga le tulaga lelei, o nei meapueata e lelei mo tagata malaga ma tagata e fatuina anotusi e saili le feaveai e aunoa ma le ositaulagaina o le tulaga lelei o ata.
Fesootaiga
Faaiuga (MP)
Faaiuga
O le Canon PowerShot Series o loo ofoina atu ai ni meapueata e lauitiiti, ma e fiafia i ai le tagata e faaaogaina mo tagata e fana faasamasamanoa ma e fiafia i ai. Faatasi ai ma faataitaiga e amata mai i ni mea pueata faigofie e oo atu i ni meapueata e sili atu ona lelei, e maua ai le faafaigofieina, lelei o ata mautu, ma vaega e pei o le faamautuina o ata ma le vitio 4K.
Fesootaiga
Faaiuga (MP)
Faaiuga
O le Canon Close-Up &Handheld Cameras ua mamanuina mo le pueina auiliili, ma le tapunia o ata ma vitio. E laitiiti ma faigofie ona faaaoga, latou te ofoina atu le taulaiga tonu, ata e maualuga le faailoga, ma le tele o mea e mafai ona faaaoga—e atoatoa mo le vlogging, pueina o oloa, ma le latalata atu i le fatufatuai.


